

How Do You Put A Backup Camera On A 2014 Ford F150 Pickup Truck
How To Install A Backup Camera On A Ford F150
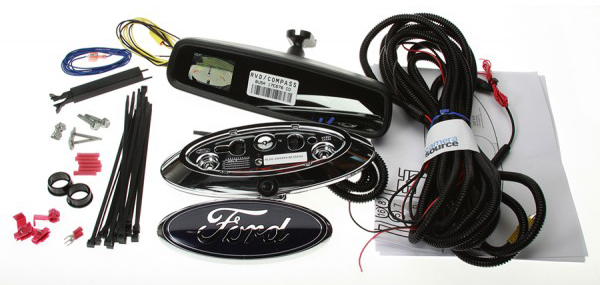 F-150 fill-in mirror kit CS-FTR-F35. This kit will but work with trucks with an existing sixteen-pivot mirror connector. If you lot do not have a connector, it is best to use kit CS-FTRa-332
Preparing The Area
Step 1
Remove the rear view mirror glass prior to starting the projection. We recommend working with a professional person. The glass breaks very easily and near machine glass companies can do this for costless.
Stride 2
Use line-fishing line to remove the Ford emblem from the tailgate.
Footstep 3
Locate the center hole with your finger. Use a razor knife to cut away tape from center hole as a foursquare.
Step iv
Locate the square holes to the left and right of the center hole. They are currently behind the tape. These are not the holes that the decal fits into. Cut the tape away from these holes in a foursquare shape.
Step 5
Apply the kit'due south two included torso nut clips and push them into the left and correct side foursquare openings.
Installing The Wiring
Pace 6
Fish the kit'due south included photographic camera cablevision through the tailgate and out the opening in the bottom of the Ford F150.
Pace 7
Pull the cord all the way through and connect the emblem to the body nut clips.
Step eight
Fasten the emblem to the tailgate using the kit's included body bolts.
Step 9
Open the tailgate upwardly and lay apartment. Fish the wire through the opening in the back of the bed. The opening is located between the bed of the truck and the tailgate.
Connecting The Camera
Step 10
Carefully connect the camera to the chassis harness. It is keyed and merely goes together one way. Button it in as tight as you can to ensure a good connection.
Step 11
Cut off the alternate power supply certain and constrict it inside the harness. From hither we are going to make all of the connections in the cab.

Important Notation: Retrieve that the red wire at the rear of the harness is but to exist used if you do not want to locate a power source inside the cab. Both carmine wires are live when power is applied.
Step 12
Route the chassis harness along the frame and come up up into the engine compartment next to the brake booster.
Step 13
Button the harness through the master wiring grommet by putting a slit in the nipple at the top of the grommet.
Step 14
Peel back the loom and feed the wire through the grommet. Exist careful non to damage the RCA stop.
Step xv
Cut the excess loom to fit. The harness should pull nicely through the indented hole in grommet.
Step xvi
Remove the overhead trim panel with a hard tug or tool and disconnect the wires.
Step 17
Remove the last lock from the connector and pull off the face of the connector.
Installing The Camera Wiring
Footstep 18
Insert yellow and black video wires into connector: yellowish to pin 8 and black to pin xvi. Supplant the last lock.
Important Note: If in that location is no wire in pin 2, you volition as well need to add the CAN bus terminal as shown in instructions in kit.
Step 19
Carefully cut abroad and remove the wire sheathing so that the video wires can be paired with the main harness. The video wires will be covered using the blackness trim encompass included in the backup photographic camera kit.
Step 20
Remove the a-pillar cover with a tug. If you have a handle, remove the 2 bolts before tugging.
Step 21
Remove the dash-side console and route the RCA and camera power/ground wires from the kit up forth the a-pillar rail.
Pace 22
Connect the RCA to the mirror RCA input. This can be tucked along the headliner and the drinking glass in the a-pillar.
Step 23
Road the ability and ground wires to the upper heart console area.
Footstep 24
Locate the contrary-activated power wire in the mirror pine: blue/white wire in pin 9.
Step 25
Use the kit's tap splice to connect the camera red wire to the reverse-activated power wire in the harness.
Step 26
Connect the photographic camera back to the black wire in grounded pin iv of the manufacturing plant connect. Splicing, soldering, and shrink wrapping your connections is recommended.
The Final Touches
Step 27
Tuck the photographic camera power/ground wires between the headline and glass.
Step 28
Secure the wires against the a-colonnade using strong tape. Make sure the airbag is clear. Reinstall the a-colonnade cover.
Stride 29
Plug in the mirror and install on the wedge. If you want to test beginning (always a good thought), push it on only far enough so information technology is on temporarily.
Footstep 30
Exam the photographic camera by starting the truck and placing information technology in reverse. Y'all should see the mirror light up with a video image.
Step 31
Push wires dorsum in overhead and put trim panel back in the headliner. Putting the headliner in place may take a few tries and a few good pushes.
Step 31
Snap the tailgate emblem on the housing.
Enjoy Your New F150 Backup Photographic camera
Congratulations! You've just installed a brand new fill-in photographic camera on your Ford F150. Now you tin enjoy the added convenience and safety a backup camera provides when parking or reversing.
If yous demand further explanation of installation instructions, view your fill-in photographic camera kit'southward instruction manual, or check out the video below:
Source: https://camerasource.com/blog/how-to-install-a-backup-camera-on-a-ford-f150/
Posted by: colewittionfer.blogspot.com
0 Response to "How Do You Put A Backup Camera On A 2014 Ford F150 Pickup Truck"
Post a Comment